
Clean, measure, tape, and paint regulation lines using acrylic court striping paint.
If you want a clean, durable dual-use court, you’re in the right place. I’ve painted dozens of overlays, and I’ll walk you through how to paint pickleball lines on a tennis court with pro steps, mistakes to avoid, and easy math you can trust.
Tools and materials you’ll need
Gather everything before you begin. This saves time and prevents uneven drying.
- Measuring tape at least 200 feet and a laser measure for double checks
- Chalk line reel, blue chalk, and carpenter pencils
- Painter’s tape, 2 inches wide, outdoor grade
- Acrylic textured court striping paint, contrasting color to tennis lines
- 3-inch angled brush and 4-inch mini roller with low-nap covers
- Line striper or straight-edge board for steadier rolls
- Leaf blower, push broom, and clean rags
- Mild degreaser and a bucket for spot cleaning
- Crack filler and patch compound for small repairs
- Kneepads, gloves, and a respirator rated for paint fumes
Pro tip from the field: buy extra tape. You’ll use more than you think.

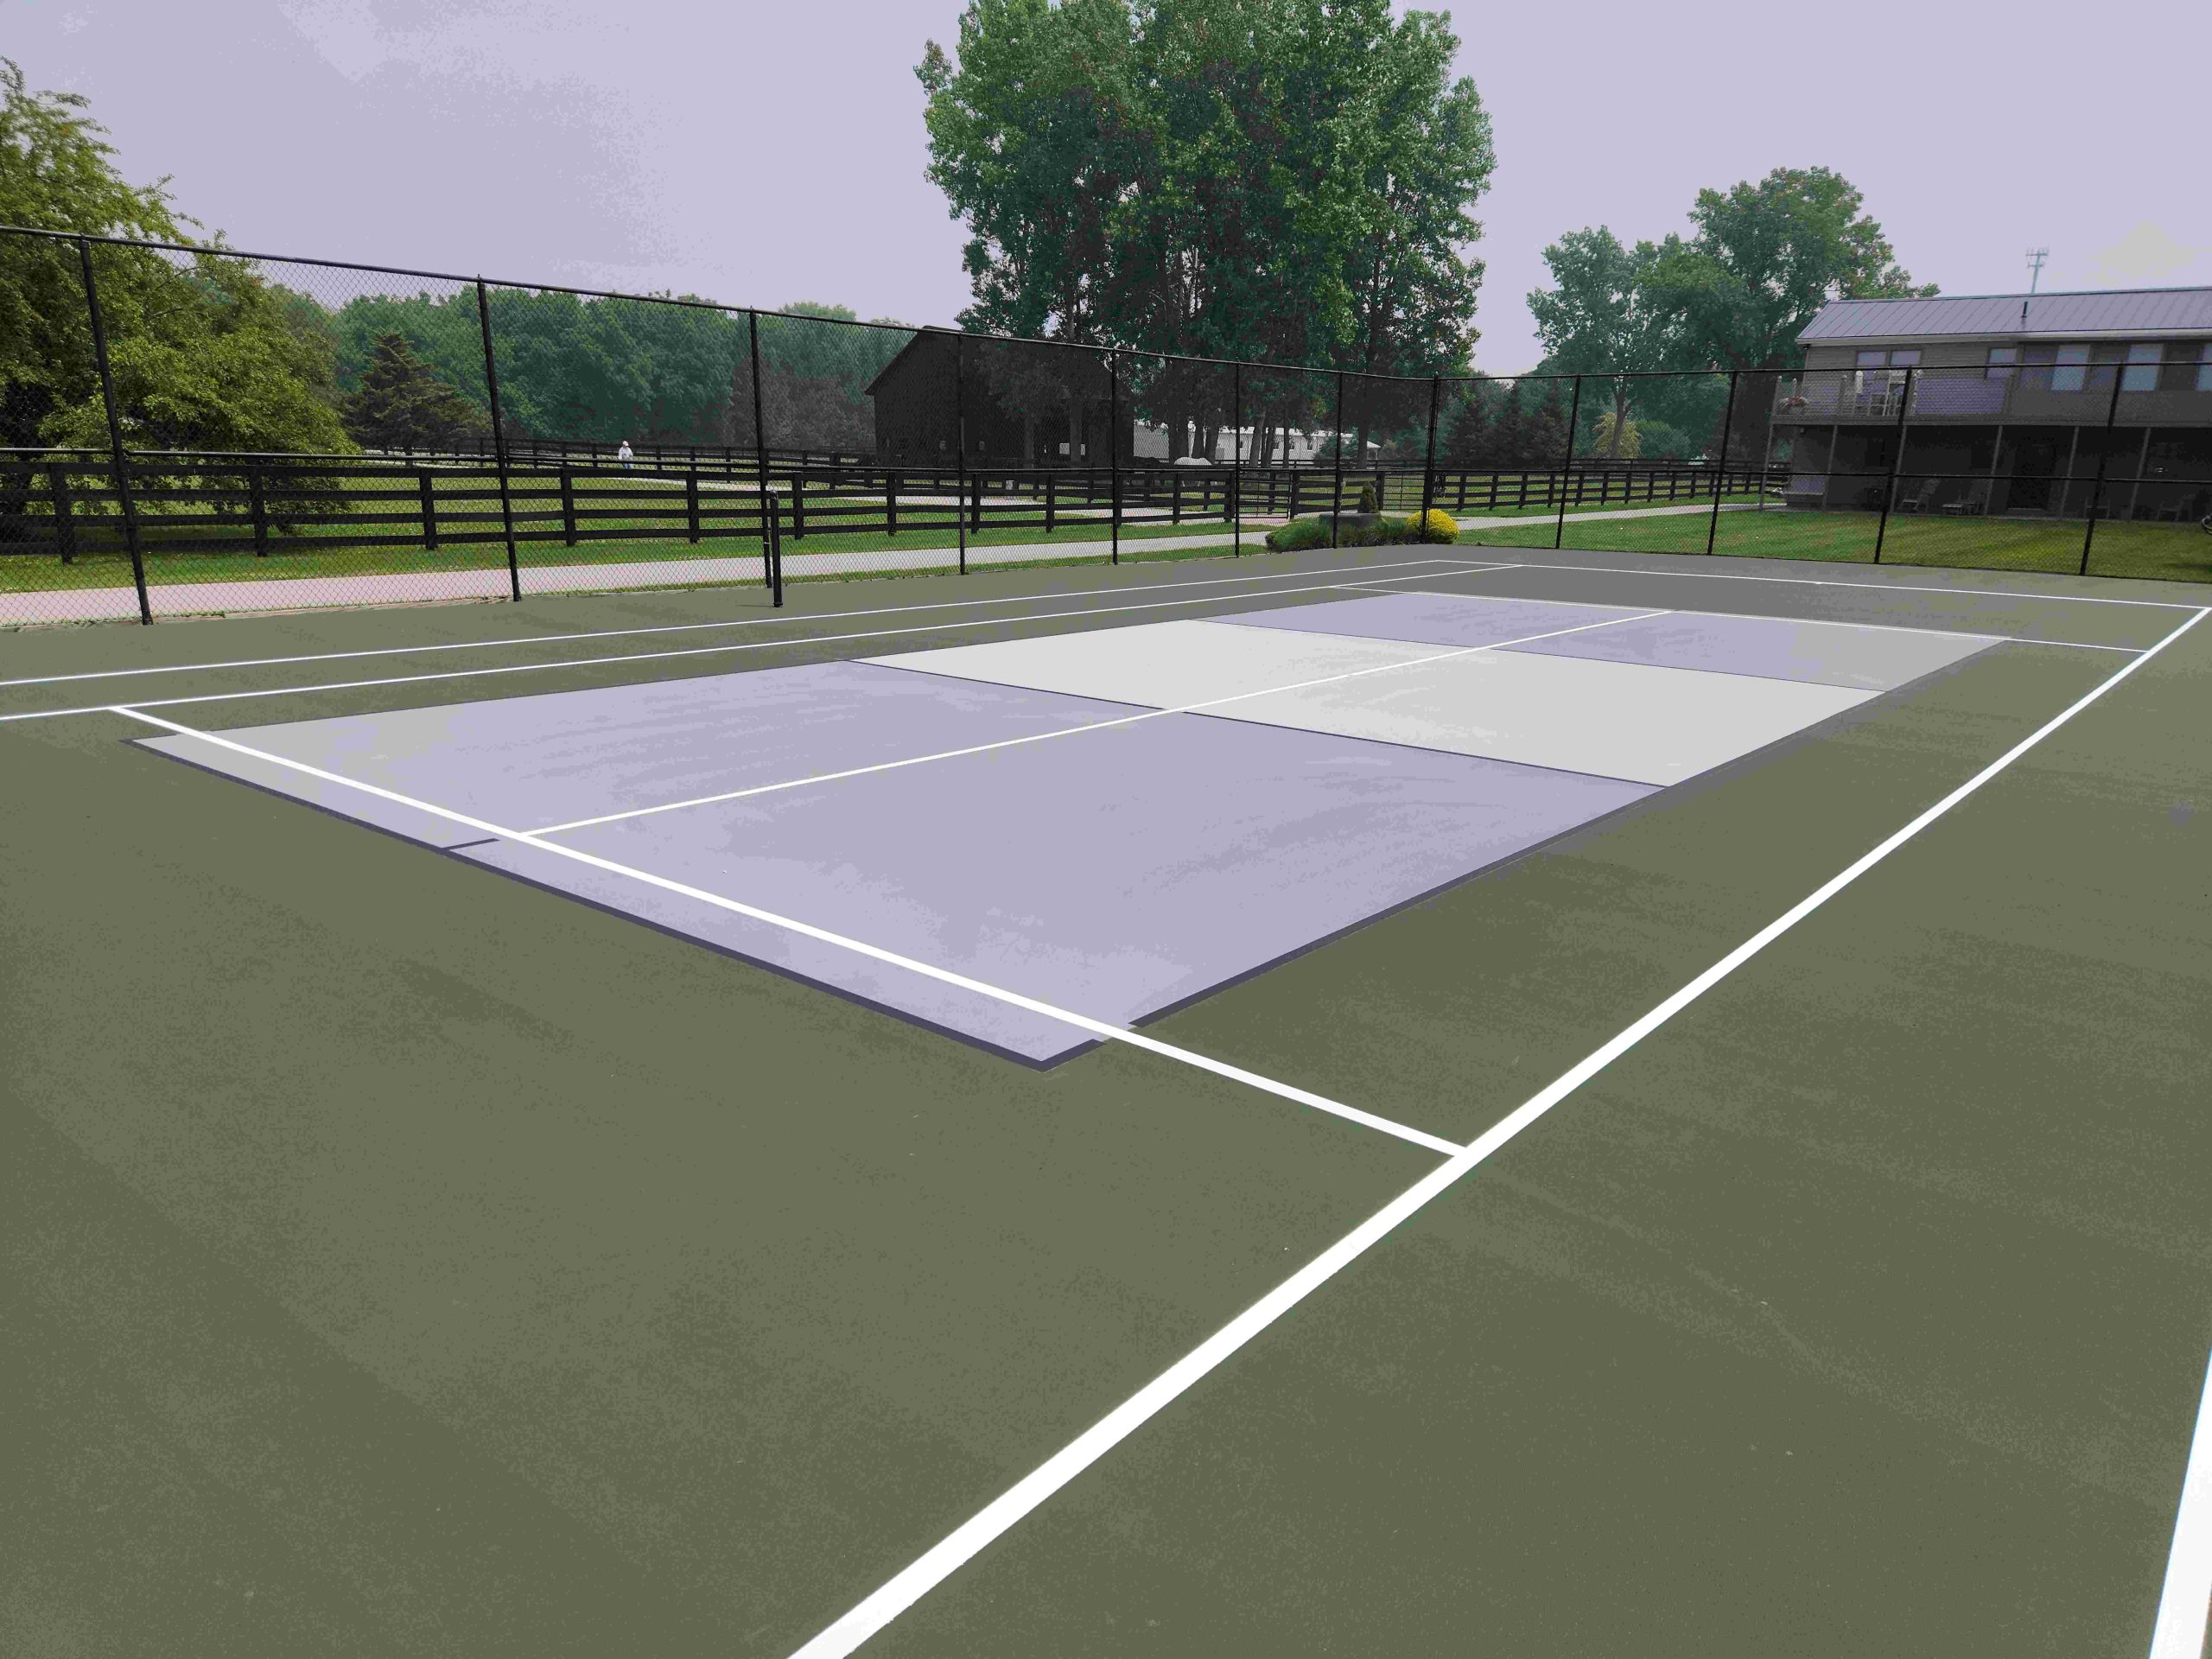
Court dimensions and line standards to know
A standard pickleball court is 20 feet wide by 44 feet long. The non-volley zone is 7 feet from the net on both sides. All lines are usually 2 inches wide and must contrast with the court color.
Key items to mark:
- Baselines and sidelines define the 20 by 44 feet rectangle
- Non-volley zone lines are parallel to the net at 7 feet
- Centerlines split the service boxes on each side
- Service lines run from sideline to sideline, 15 feet from the non-volley line
Follow USA Pickleball specifications for accuracy. This keeps play fair and keeps you compliant.
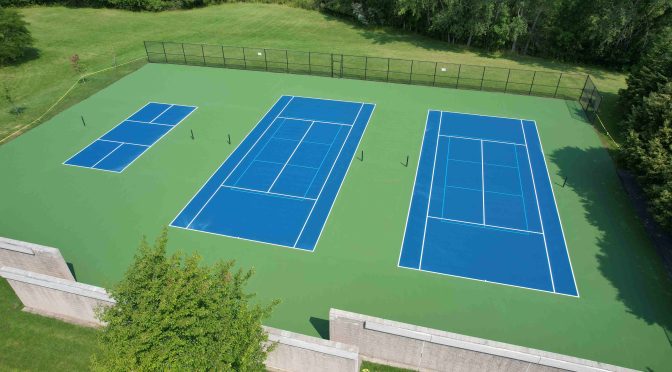
Plan your layout on a tennis court
There are three common overlays. Choose what fits your space and permits.
- One court centered inside the tennis singles lines. This is simple and clean.
- Two courts within the 60 by 120 feet tennis pad with generous run-off.
- Four courts inside the full 60 by 120 feet pad using a grid layout.
Confirm facility rules before you paint. Many sites ask for a color different from white so tennis players are not confused. If you want to explain how to paint pickleball lines on a tennis court to a city official, bring a sketch with measurements and colors.

Surface prep that makes paint last
Good prep is half the job. Do not rush it.
- Sweep and blow the surface until it is dust free
- Spot clean oils and bird droppings with a mild degreaser
- Fill hairline cracks and small pits; let them dry fully
- Paint only when the surface is dry and the temperature is 50 to 90°F
Avoid painting late in the day if dew forms at night. Dew can ghost the lines. I learned that the hard way on an early spring job.
Step-by-step measuring and snapping lines
This is where exactness matters. Go slow and verify every dimension.
- Establish the main rectangle. Measure 20 feet by 44 feet for each court. Mark corners with small tape tabs.
- Square the corners. Use the 3-4-5 method or a laser to ensure right angles.
- Snap chalk lines for baselines and sidelines. Keep chalk light so it cleans up.
- Mark the non-volley line. Measure 7 feet from the net line on both sides. Snap a line.
- Mark service lines. From the non-volley line, measure 15 feet toward the baseline. Snap across.
- Mark centerlines. Measure and snap from the non-volley line to the service line, dividing the boxes.
Say out loud what you’re marking as you go. It helps catch mistakes before taping.

Taping for crisp, pro-grade lines
Clean, crisp edges come from smart tape work.
- Use 2-inch outdoor painter’s tape for the full line width
- Place tape to the outside of your chalk lines so the painted stripe is true
- Press and burnish the tape edge with a plastic putty knife
- Seal the tape edge with a light pass of the same color as the base surface or a thin first coat of your line color
That edge seal trick is a pro move. It stops bleed and gives razor sharp lines.

Painting the lines
Acrylic textured striping paint is best for grip and durability.
- Stir well. Do not thin unless the label says you can
- Cut the edges with a 3-inch brush, then fill with a 4-inch mini roller
- Apply thin, even coats. Plan two coats for full, even color
- Keep a wet edge and watch for drips at tape seams
Ideal conditions are mild temperature and low wind. If you teach others how to paint pickleball lines on a tennis court, remind them that thin coats win. Heavy coats can peel.

Drying, tape removal, and curing
Timing is key for a clean pull.
- Remove tape when the paint is dry to the touch but not fully hard
- Pull at a 45-degree angle, pulling back on itself
- Let the lines cure for 24 to 48 hours before heavy play
If a tiny bit of lift occurs, press it back gently and dab with a brush. It happens.

Should you seal the lines?
Most overlays do not need a clear sealer. Acrylic line paint bonds well to acrylic surfaces.
Consider a sealer if the court sees high traffic or constant moisture. Use a matte acrylic compatible with your paint. Test a small area first.
Pros and cons exist. When you plan how to paint pickleball lines on a tennis court, focus on prep, not just sealer choice.
Maintenance and touch-ups
Simple upkeep keeps the court looking fresh.
- Rinse dirt and pollen with water to reduce abrasion
- Spot clean scuffs with a mild cleaner and a soft pad
- Touch up chips before they spread
Plan a light refresh every 18 to 36 months, based on play volume and climate.
Cost, time, and project checklist
Budget and plan ahead. It makes the day go smooth.
Typical costs per court:
- Tape, chalk, and sundries: low to moderate
- Acrylic striping paint: one to two gallons, moderate
- Tools you keep: brushes, rollers, and a decent striper
Time estimate per court:
- Layout and snapping: 1 to 2 hours
- Taping: 1 to 2 hours
- Painting two coats: 1 to 2 hours plus dry time
- Cleanup and cure: variable
Checklist before you start:
- Measurements verified twice
- Weather window clear for 24 to 48 hours
- Permission and color plan approved
- All tools and safety gear on site
People often ask how to paint pickleball lines on a tennis court with minimal downtime. The trick is to stage tools, tape all lines first, then paint in one efficient pass.
Safety, permissions, and color choices
Safety first. Comfort next.
- Wear gloves, eye protection, and a respirator when painting
- Keep paint away from drains and plants
- Confirm permits with the facility or city, especially for public parks
- Choose a line color that contrasts with the surface but not with tennis white lines
If kids or pets are nearby, rope off the area. For best community use, document how to paint pickleball lines on a tennis court, include diagrams, and get sign-off.
Common mistakes and how to fix them
I’ve seen them all. Here is how to avoid or repair them.
- Wavy lines. Fix with a straight-edge and careful tape reset.
- Paint bleed. Seal tape edges or sand and repaint the spot.
- Wrong dimensions. Always square corners and re-measure before paint.
- Slippery lines. Use textured acrylic, not glossy paint.
If you mess up a section, don’t panic. Let it dry, sand lightly, and repaint. Keep teaching yourself how to paint pickleball lines on a tennis court by noting each fix.
Temporary options if you cannot paint
Sometimes permanent paint is not allowed. Use temporary lines.
- Court-safe removable tape made for sport surfaces
- Chalk line powder for short events
- Throw-down rubber lines for clinics
These are great for testing layouts. They also help you practice how to paint pickleball lines on a tennis court before doing the real thing.
Frequently Asked Questions of how to paint pickleball lines on a tennis court
What paint should I use for pickleball lines?
Use acrylic textured court striping paint made for outdoor sport surfaces. It bonds well, resists UV, and offers grip.
How wide should the lines be?
Use 2-inch wide lines for all markings. This matches common standards and keeps sight lines clear.
How many pickleball courts fit on one tennis court?
You can fit one, two, or four within a standard 60 by 120 feet tennis pad. Four is common for shared facilities with portable nets.
Can I remove the lines later?
Painted lines are semi-permanent and hard to remove cleanly. For short-term use, pick court-safe removable tape or chalk.
How long do the lines last?
With good prep and quality paint, lines often last 2 to 3 years. Heavy play, harsh sun, and poor prep shorten that timeline.
Do I need permission to paint at a public park?
Yes, always. Get approval from the facility, HOA, or parks department before painting.
What color should pickleball lines be on a tennis court?
Choose a color that is not white to avoid confusion with tennis lines. Yellow, light blue, or a bright green often works well.
Conclusion
You now have a clear, field-tested plan for clean, durable lines. Measure twice, tape smart, and paint in thin coats. That is the heart of how to paint pickleball lines on a tennis court with pro results.
Grab your tape, chalk your layout, and start with one court. Share your progress, ask questions, and keep refining your process. If you found this useful, subscribe for more build guides, or leave a comment with your layout challenges so we can solve them together.